How to improve your Zoom setup to teach surgical skills
We can effectively teach medical students some of the most basic surgical skills over the internet. I break down the 7 key steps how to improve your Zoom setup for teaching surgical skills.

We can effectively teach medical students some of the most basic surgical skills over the internet. I break down the 7 key steps how to improve your Zoom setup for teaching surgical skills.
1. Start with first-person video
The first time I tried to teach surgical techniques in a distance learning context, it was immediately clear to me that the conventional laptop webcam - the little eye that lives on the top of your laptop screen - was completely insufficient for teaching complex visuospatial tasks.
Think about it: if you're a instructor and want to show the student your hands about how to make a certain maneuver, you need to angle the whole screen down, at which point you can no longer see the student, and you have no idea if the message is getting across.
The solution to this problem was to create a setup where I could easily share a first-person perspective video stream.
There are a number of ways that cinematographers achieve the first-person perspective. I've written about the impact of mounting the camera on the surgeon's head for capturing immersive operative footage, but for this task, a fixed overhead camera angle is ideal.
The overhead camera angle can be achieved with as basic of a setup as a tripod and smartphone, but be careful that you don't accidentally tip this over. If you're worried a sand bag (or any improvised counterweight) might help!
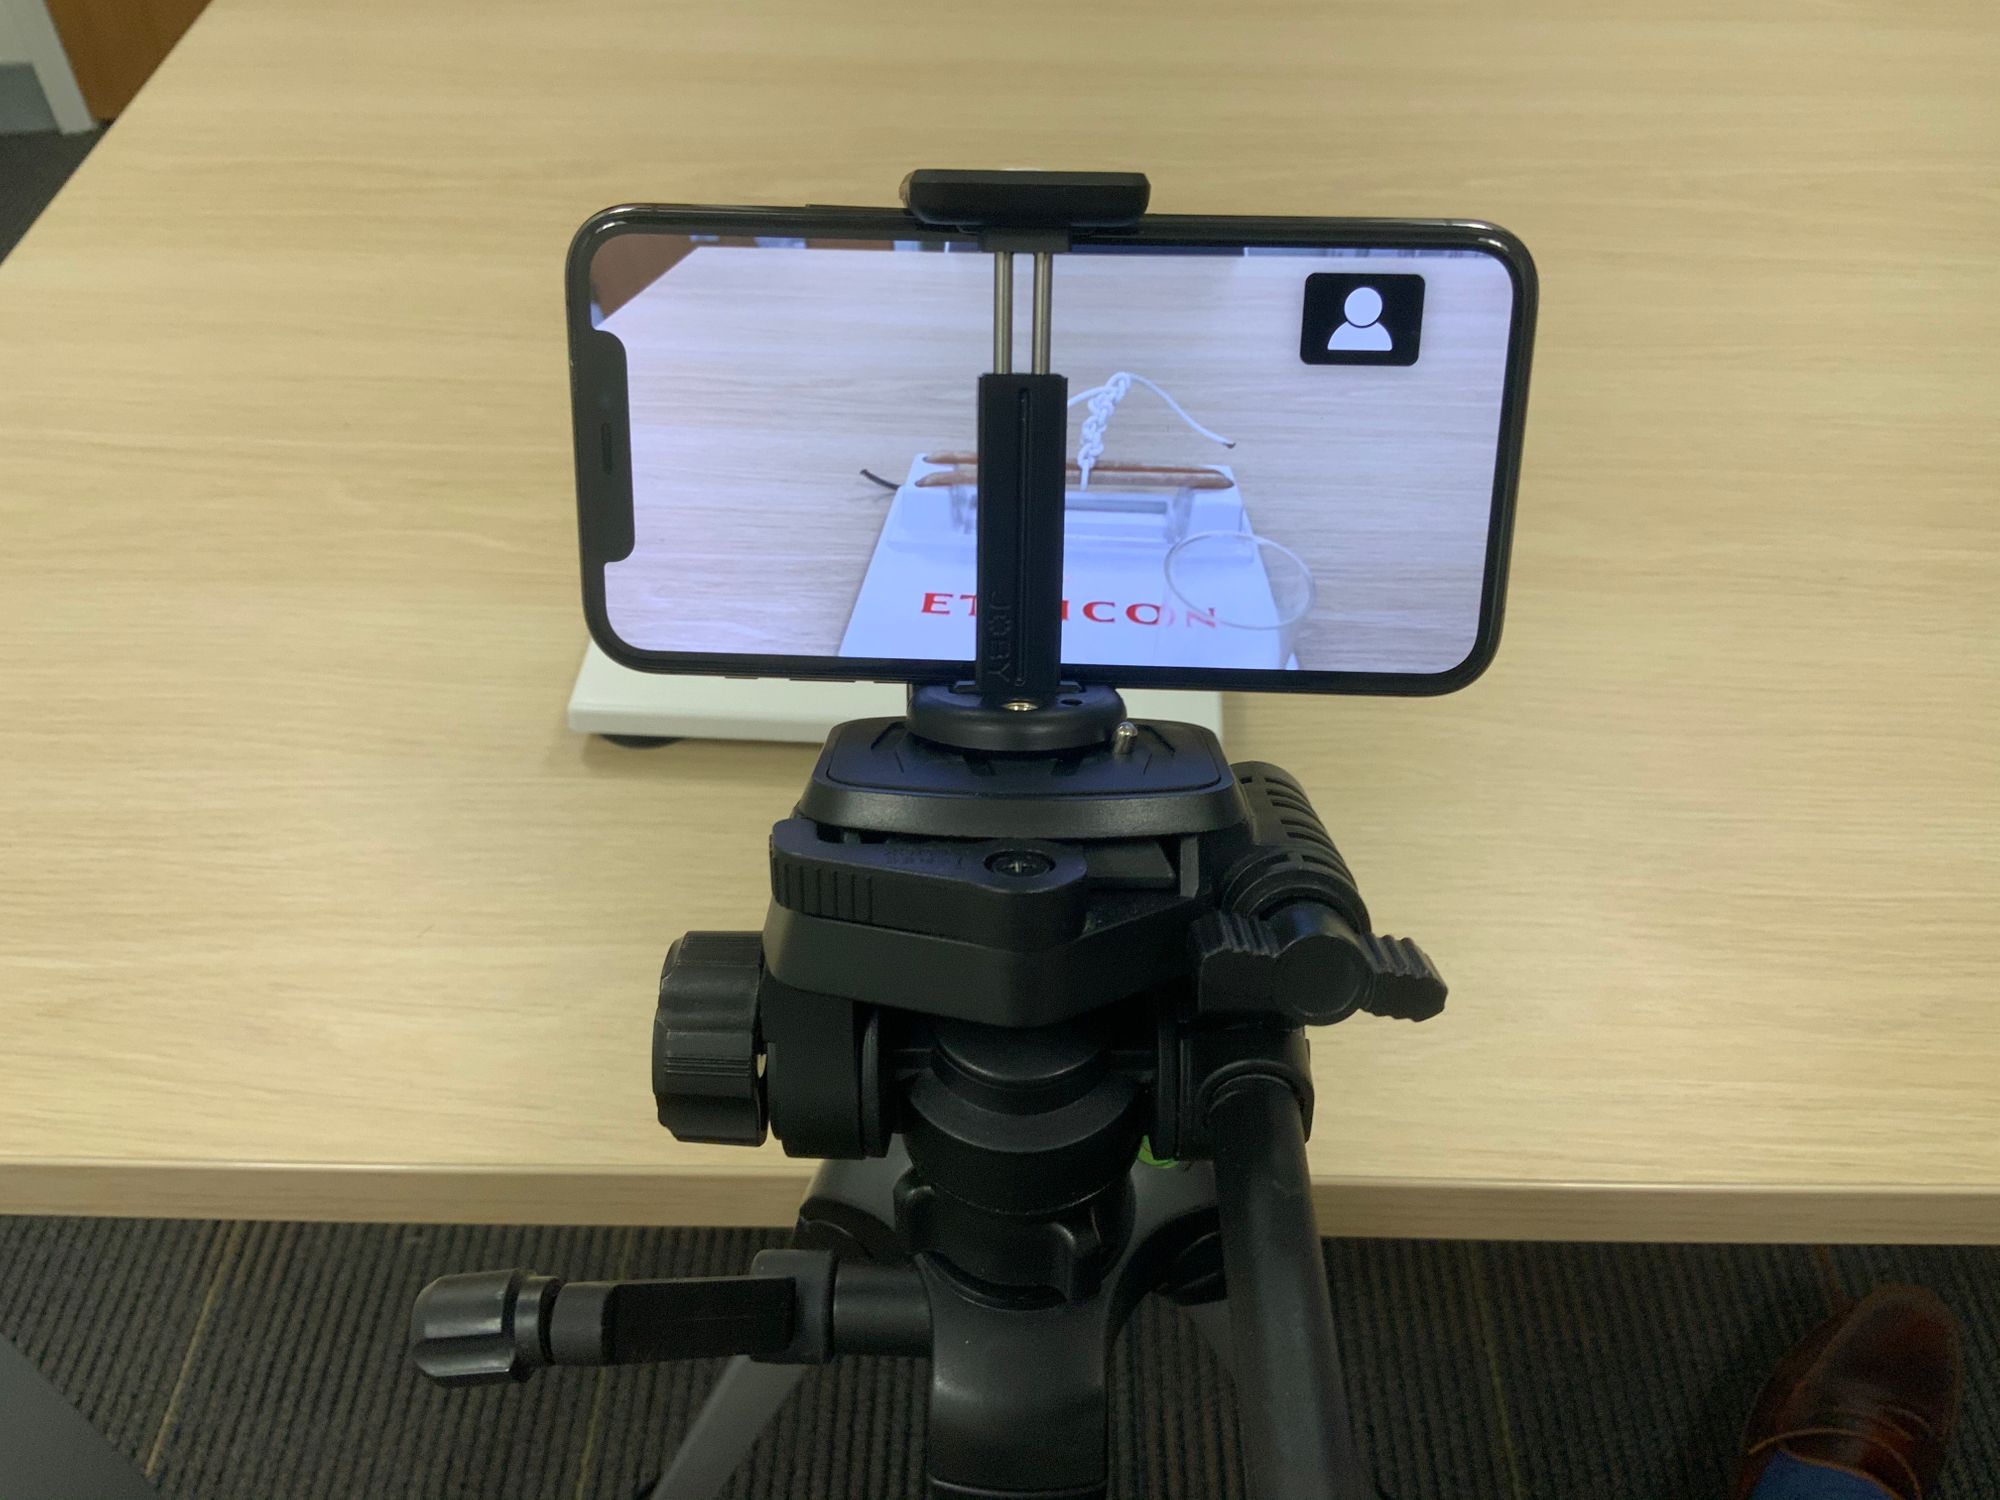
The overhead perspective camera can now be set as the pinned video, and the instructor can connect to the meeting with their laptop in order to share lecture slides that might be pertinent to the surgical skills being demonstrated.
This setup works, but is really limiting. It is not ergonomic to have to operate around a camera and tripod, and this might make demonstrating skills more difficult. As I taught more and more complex tasks over Zoom, I found that I needed more advanced optical capabilities in order to demonstrate what was being discussed. And most importantly, I wanted to see what the students were doing in real time from their first-person perspective.
2. Standardize the perspective
In or around May 2020, I realized that it would not be logistically and financially feasible to procure external webcam setups for entire classes of medical students going through the surgical clerkship. I needed a cheaper solution for the problem, one that wasn't reliant on supply chains and international shipping.
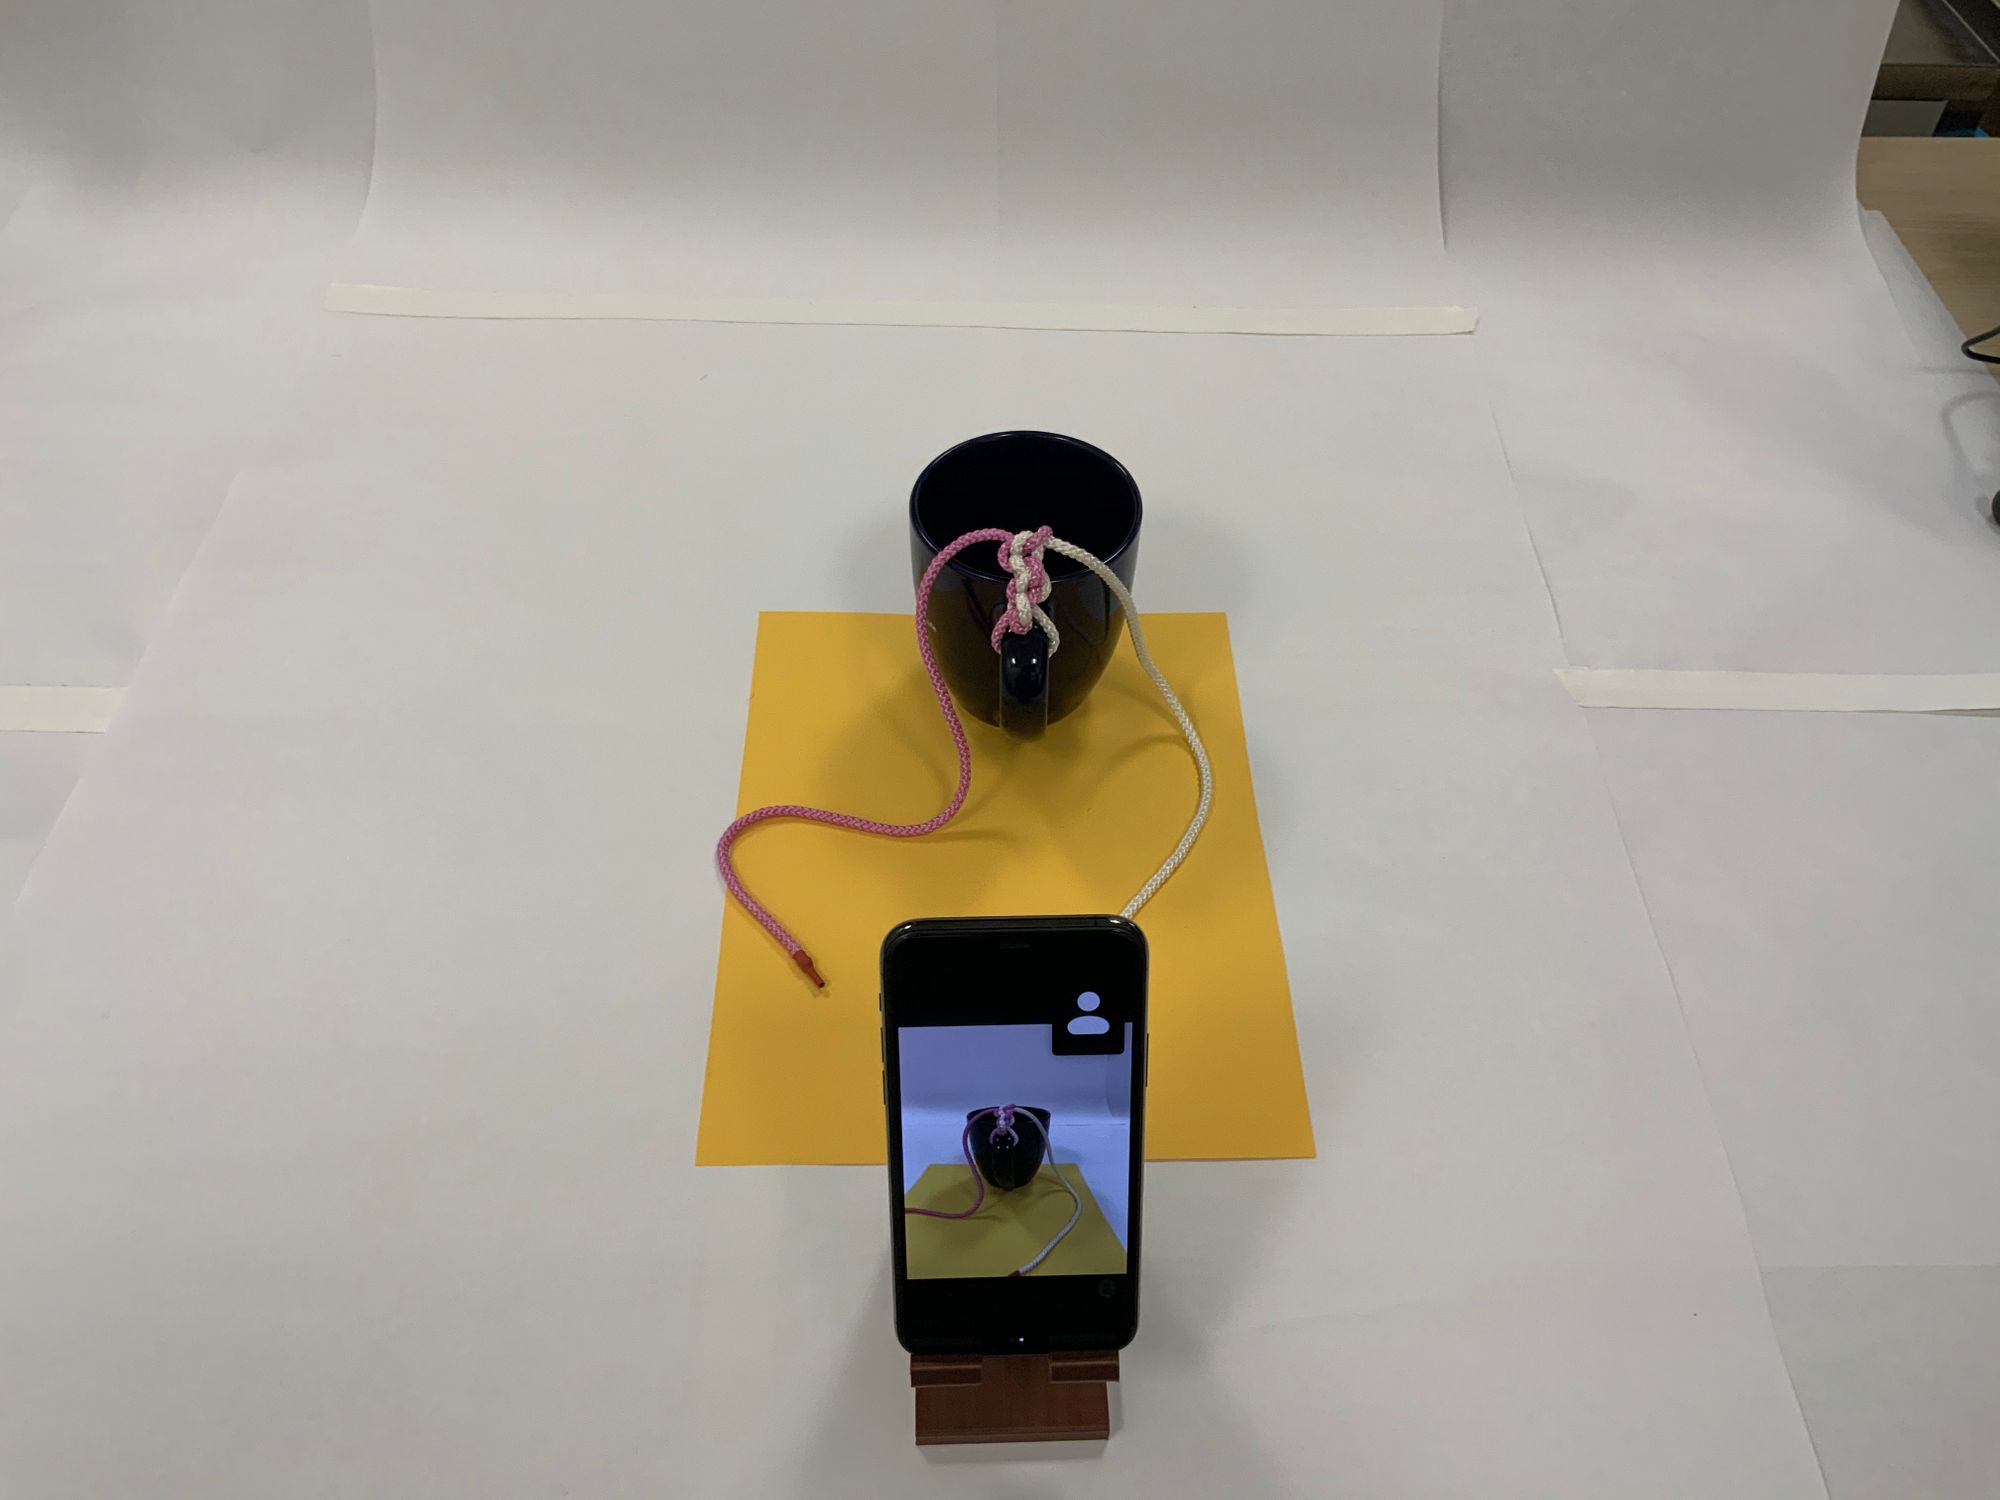
I used my small fleet of 3D printers to print dozens of simple, unibody style universal phone docks and asked the students to connect using the mobile app and use the rear-facing cameras on their phones.
To accommodate for smaller differences – such as the phone's size or placement of the rear camera – I've found it helpful to place a contrasted color sheet of paper down on the simulated operative field.

3. Upgrade the Instructor's setup
The instructor should be facile with the setup that the students are using, and I recommend that initially you use the exact same setup – it will help you realize the benefits and limitations of the 3D printed phone dock.
If you find, like I have, that students are receptive to learning these skills remotely, you may find that you want to upgrade your setup in order to show more.
Here's a running list of the upgrades I've done so far:
- Camera and Lens: Once you depart from using the smartphone setup and move towards a "real" camera, you unlock a new world of potential for visual demonstration. Currently my recommendation for the novice photographer looking to also broadcast surgical skill education is pretty broad: any full-frame mirrorless camera body with a variable angle zoom kit lens is a good place to start. Every camera company has an entry level model that meets these basic requirements. In early 2020, I purchased Canon's most entry-level camera body, the EOS RP, because it was an inexpensive device that met the above criteria. Also, at the time it had a beta version of a USB webcam software, and that was a big selling point because capture cards were not available. Now that capture cards are back to being easily accessible, please do further research before investing in a camera system. My experience has been that my EOS RP has put up with hundreds of hours of use well.
- Capture Card: Capture cards let you turn your expensive sensor and glass into the most incredible webcam. There are a number of generic manufacturers who sell 1080p30 capture cards, which are usually good enough. I've also invested in an El Gato CamLink 4K which I would recommend highly; I mostly use it for the 1080p60 feature.
- Lighting: You're going to want a bright, soft light source in order to avoid having shadows on your simulated operative field. I am just using a Neewer ring light with adjustable color temperature for now.
- Microphone: Although this is mostly a visual experience, don't neglect how important sound is for the quality of your work. At the outset, I was using the same wireless headphones that I use for normal videoconferencing, which work well but have suboptimal audio quality. I have since upgraded to a small Rode shotgun microphone, which is mountable on the camera, with a noticeable improvement.
- Boom Mount: Definitely the biggest upgrade in terms of footprint required, a professional grade boom mount was also one of the biggest upgrades in making our studio setup more professional. Now, I can mount the overhead camera above the instructor without it obstructing the view from the face camera or being in the composition of the shot.
- Broadcast Software: Right now I'm using both StreamLabs OBS and regular OBS. If I just need a lightweight, quick virtual webcam to patch through the video feed, I'll use OBS. For a more complex of video stream, especially anything with multiple cameras and transitioning between them, I'll use StreamLabs OBS.
4. Pick a task and build a kit
In order for your whole class to have success, everyone has to have the tools and materials they'll need to complete the tasks at hand.
For the most fundamental surgical skill, knot tying, we use very rudimentary equipment: a shoelace and a coffee mug. This task really needs to be scientifically validated, but it strikes me that since most people haven't learned a knot tying technique since tying their shoes, and we probably start out with the most muscle memory with shoelace diameter suture material, it's at least a reasonable option. In the remote context, shoelace also will be captured by the video sensors much more reliably than normal caliber suture material. The coffee cup is also deceptively interesting: if it's not secured to the surface, you can see how much the cup deviates from its initial position as a surrogate for measuring the force on the suture material.
As you get more complex with the tasks, you need to build a kit that includes surgical equipment that can be distributed to the students, returned for cleaning and restocking.
Here's what we included in our first kit, which was designed to include everything necessary to complete both our knot tying and introductory suturing remote sessions:
- 3D printed standardized phone mount
- Suture practice pad
- Needle driver
- Forcep
- Scissor
- Red/white shoelace
- 2-0 silk ties x 12 pack
- 2-0 silk on SH needle x 2
- 4-0 prolene on SH needle x 2
- 4-0 monocryl on PS-2 needle x 2
We've been bundling these supplies into a Ziploc bag and distributing them to the resident work rooms, where the medical students could easily pick up and drop off their kits.
5. Follow a script
It's important to have structure and clarity if you're attempting to teach a manual skill over the internet, especially one as complex and important as surgical maneuvers. Writing a script for what you intend to communicate is essential to getting the point across as clearly as possible.
To help write these scripts, I've found that focusing on one simple task at a time, and validating that the students can perform each task in sequence is generally a safe approach.
6. Spotlight video for instant feedback
The real power of this setup comes when you are able to give real-time feedback to students. Their work is right in front of you, and you are able to offer the suggestions you would normally give if you were standing over their shoulder.
The image at the top of this post is an compilation of the spotlighted videos for instant feedback during one of our first sessions of fully remote surgical skills education.
7. Follow-up with objective assessments and in-person follow-through
I've been bookending each of these remote surgical skills sessions with pre- and post- assessments whenever possible.
The pre-assessments will help you fine-tune each session for the cohort of students and can identify key points for discussion. The post-assessments are useful, and I've been able to demonstrate significant improvements in students' confidence in performing these moves.
That being said, this it's still early days and I don't think you should go right from Zoom to the OR quite yet. Following through after the intervention with an in-person assessment is key to making sure that students are able to do these skills before going into in vivo scenarios is essential.
For more, see our manuscript "Development of an Interactive Remote Basic Surgical Skills Mini-Curriculum for Medical Students During the COVID-19 Pandemic," in press at Surgical Innovation.

B Q M D Newsletter
Join the newsletter to receive the latest updates in your inbox.